
Exploring Awning Arm Replacement Parts: A Guide for RV Owners
Awning arms are essential components of any RV’s awning system, providing support and stability to the fabric canopy that shields outdoor spaces from the elements. Over time, wear and tear can take a toll on these crucial parts, leading to the need for replacement. Understanding awning arm replacement parts is vital for RV owners looking to maintain and extend the lifespan of their awnings. Here’s a comprehensive guide to help you navigate the world of awning arm replacements:
Types of Awning Arms
There are various types of awning arms available on the market, each designed to suit different awning systems and configurations. The two main categories of awning arms are manual and automatic.
- Manual Awning Arms: These traditional awning arms require manual operation to extend and retract the awning fabric. They are typically more straightforward in design and function, making them easier to maintain and repair.
- Automatic Awning Arms: Automatic awning arms feature motorized mechanisms that allow for effortless extension and retraction of the awning with the push of a button. While convenient, automatic awnings may have more complex components that require specialized replacement parts.
Common Replacement Parts
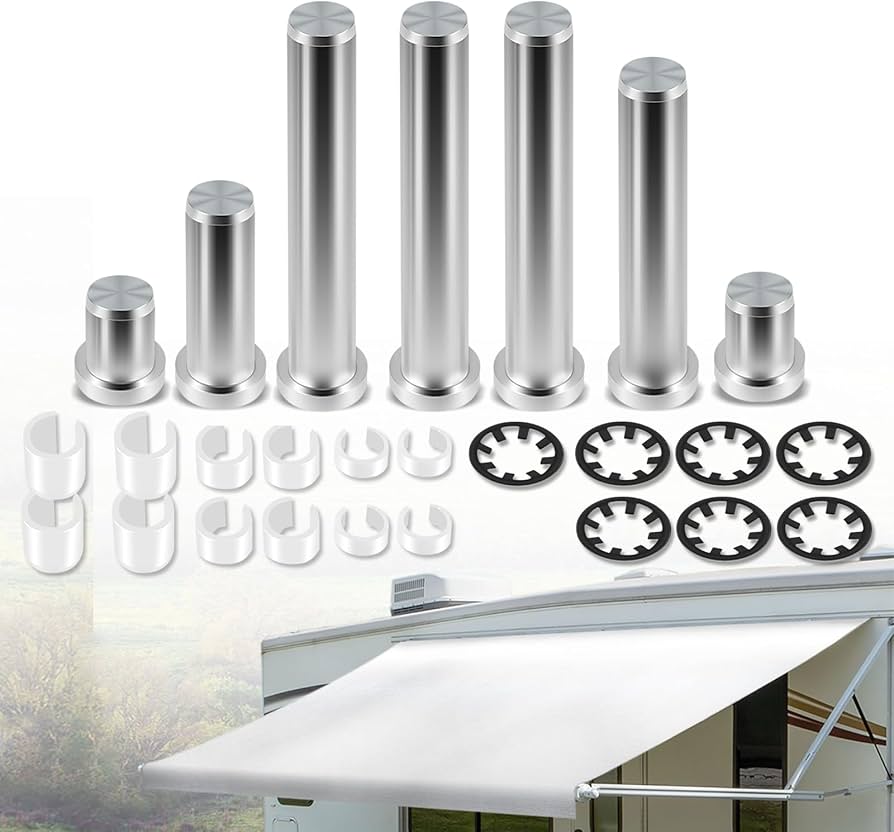
When it comes to replacing awning arms, several key components may need attention:
- Arm Assemblies: The main structural components that support the weight of the awning fabric.
- Roller Tubes: The cylindrical tubes around which the fabric rolls when retracted.
- Springs and Tensioners: Mechanisms that provide tension to keep the fabric taut when extended.
- Hinges and Brackets: Connectors that allow for movement and adjustment of the awning arms.
Finding Replacement Parts
When searching for replacement parts for your awning arms, it’s essential to consider factors such as compatibility, quality, and warranty. Many RV manufacturers offer specific replacement parts designed to fit their proprietary awnings. Alternatively, there are aftermarket suppliers that provide a wide range of generic replacement parts suitable for various makes and models.
Installation and Maintenance Tips
If you’re considering replacing your awning arm parts yourself, be sure to follow manufacturer guidelines and instructions carefully. Proper installation is crucial for ensuring optimal performance and safety. Regular maintenance, such as lubricating moving parts and inspecting for signs of wear, can help prevent premature damage and prolong the life of your awning system.
In Conclusion
Awnings play a vital role in enhancing outdoor living spaces for RV owners, providing shade, protection from rain, and a cozy ambiance. Understanding how to identify, source, and replace awning arm parts is key to keeping your RV’s awnings in top condition. By staying informed about common replacement components and maintenance practices, you can enjoy many more years of outdoor comfort on your travels.
7 Essential Tips for Replacing Awning Arm Parts Safely and Effectively
- Ensure to purchase the correct size and type of replacement awning arm for your specific awning model.
- Follow the manufacturer’s instructions carefully when replacing awning arms to ensure proper installation.
- Inspect all components of the replacement arm kit before starting the installation process.
- Use appropriate tools and safety equipment while replacing awning arms to prevent accidents or damage.
- Check for any signs of wear or damage on other parts of the awning that may need replacement or repair as well.
- Consider seeking professional help if you are unsure about how to replace awning arms correctly.
- Regularly maintain and lubricate your awning arms to prolong their lifespan and ensure smooth operation.
Ensure to purchase the correct size and type of replacement awning arm for your specific awning model.
To ensure a successful awning arm replacement, it is crucial to purchase the correct size and type of replacement awning arm that matches your specific awning model. Choosing the wrong size or type of awning arm can lead to improper fitment, functionality issues, and potential safety hazards. By carefully identifying and selecting the appropriate replacement part that aligns with your awning system’s specifications, you can guarantee a seamless installation process and optimal performance of your RV’s awning for many adventures to come.
Follow the manufacturer’s instructions carefully when replacing awning arms to ensure proper installation.
Following the manufacturer’s instructions carefully when replacing awning arms is crucial to ensure proper installation. Manufacturers provide specific guidelines and steps tailored to their awning systems, ensuring that the replacement process is carried out correctly. By adhering to these instructions, RV owners can avoid potential errors that may compromise the functionality and safety of their awnings. Taking the time to follow the manufacturer’s recommendations guarantees that the new awning arms are installed securely and perform optimally, providing peace of mind for future outdoor adventures.
Inspect all components of the replacement arm kit before starting the installation process.
Before embarking on the installation process of replacing awning arm parts, it is crucial to thoroughly inspect all components of the replacement arm kit. This step ensures that you have all the necessary parts and tools required for a successful installation. By carefully examining each component beforehand, you can identify any missing or damaged parts, allowing you to address any issues before beginning the installation. This proactive approach helps streamline the process and minimizes the risk of encountering unexpected challenges during the replacement procedure, ultimately leading to a smoother and more efficient repair experience.
Use appropriate tools and safety equipment while replacing awning arms to prevent accidents or damage.
It is crucial to use the appropriate tools and safety equipment when replacing awning arms to avoid accidents or damage. By ensuring you have the right tools for the job, such as wrenches, screwdrivers, and protective gear like gloves and goggles, you can work efficiently and safely. Taking the time to follow proper safety protocols not only protects you from potential harm but also helps prevent costly mistakes that could arise from using incorrect tools or inadequate safety measures. Prioritizing safety during the replacement process is essential for a successful and stress-free awning arm replacement experience.
Check for any signs of wear or damage on other parts of the awning that may need replacement or repair as well.
It is crucial to inspect your awning thoroughly for any signs of wear or damage on other parts besides the awning arms that may require replacement or repair. Components such as roller tubes, springs, hinges, and brackets can also experience wear and tear over time. By conducting a comprehensive assessment of the entire awning system, you can identify potential issues early on and address them proactively to ensure the longevity and functionality of your RV’s awning. Regular maintenance and timely replacements of damaged parts will help keep your outdoor living space comfortable and protected during your adventures.
Consider seeking professional help if you are unsure about how to replace awning arms correctly.
When it comes to replacing awning arms, it’s essential to prioritize safety and proper installation. If you find yourself unsure about the correct procedures or techniques for replacing awning arms, it is highly recommended to seek professional help. A qualified technician or RV service provider can ensure that the replacement process is carried out accurately and efficiently, reducing the risk of errors or potential damage. By entrusting the task to experts, you can have peace of mind knowing that your awning system is in capable hands and will continue to function optimally for your outdoor adventures.
Regularly maintain and lubricate your awning arms to prolong their lifespan and ensure smooth operation.
Regular maintenance and lubrication of your awning arms are essential practices to extend their lifespan and guarantee smooth operation. By regularly inspecting and lubricating the moving parts of your awning arms, you can prevent corrosion, reduce friction, and ensure that the mechanism functions properly. This simple yet effective maintenance routine not only helps to avoid premature wear and tear but also enhances the overall performance of your awning system, allowing you to enjoy seamless extension and retraction whenever you need it.
Related Posts
Discover Top Amazon Motorhome Accessories for Your Next Adventure
Exploring Amazon Motorhome Accessories Exploring Amazon Motorhome Accessories When it…
Exploring the Best Family-Friendly Motorhomes for Your Next Adventure
Family-Friendly Motorhomes The Ultimate Guide to Family-Friendly Motorhomes Family vacations…
Discover the Ultimate Luxury in RV Homes
The Ultimate Luxury: RV Homes The Ultimate Luxury: RV Homes…